.jpg "/storage/files/cms/images/First Form(1).jpg-title")

Here at Array, we like to tell the world just how simple it is to deploy our tools. How easy it is to create forms with the fields you want, the designs you like, and the integrations you need.
We’re always telling you just how easy it is to use Array. But today, we don’t want to tell you how intuitive our platform is. We want to show you. By walking you through the steps of setting up your very first custom form.
How to Set Up a Custom Form with Array
Start your stopwatch. It’ll take as little as ten minutes to create a powerful, custom form.
Step One: Prepare
The single biggest mistake we see when people use our tools for the first time is not having a set idea of what they need to achieve. If you’re planning on opening up Form Builder, playing around, and seeing what you come up with, you’ll find yourself spending much longer than you originally planned.
So prepare by asking the following questions:
WHO will be using this form? Will it be your Quality Assurance team? Customers submitting self-inspections? Field operatives carrying out a difficult series of tasks?
WHAT information are you trying to get from them?
WHERE will the data be sent or shared?
HOW will this form be shared with users? Via email? With a QR code? On social media?
Knowing these answers will guide you through the whole process quickly and easily.
Step Two: Create the Form Fields
Now you know what you’re building, for who, and how it will be shared, it’s time to put together your first customized form using the Array Form Builder.
Log into Array and head over to Form Builder. Clicking Create will bring up your options.
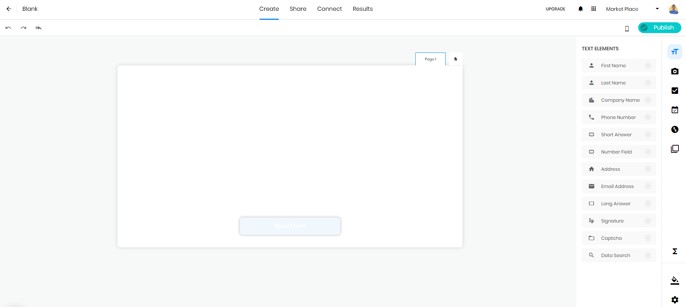
In the toolbox, you’ll see our standard text template fields under Text Elements. Things like names, addresses, etc. Drag these onto the page and you’ll begin to create your first form.
But what if you want something that’s not covered by our templated fields?
Don’t worry. It’s still simple and easy.
If you want a short answer, drag over the Short Answer template and customize your question. You can also do this for longer answers and numbers with the Long Answer and Number Field templates.
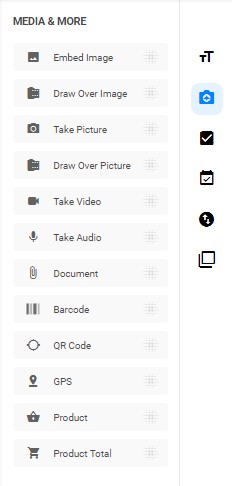
Repeat this process using the Media & More section and you’ll be able to request images, video, and GPS data.
Simply drop them in, customize your questions, and use drag and drop to order the form in an intuitive way.
That’s it. That’s the basics of creating form fields. For more in-depth information, the Form Builder section of our Help Center has you covered. You’ll also learn how to integrate fields to share data with MailChimp, Stripe and other third party apps.
Step Three: Share
Now your form is ready, you’ll want to send it out to your end users.
Next to the Create Tab at the top of the Form Builder, you’ll see Share. Clicking that will give you a range of sharing options:
- Email lets you share directly through your email client
- Link lets you create a public link or a QR code which you can share via email, SMS, or social media
- Embed lets you create an iframe or HTML version of your form to add to a website or app
- Custom Link lets you create a custom link instead of the one we generate for you
You can also customize the Public Settings to ensure that only people who need to see the form will actually see it.
For a little more guidance on sharing, take a look at this support document.
Step Four: Track the Results
Your form is ready, you’re sharing it, and now you want to see what people are saying.
It’s time to click the Results tab.
On this screen, you’ll see all of the results on one page. Which is good for an overview. If you want to dig deep into what the results are really saying, you can use filters to find submissions from specific users or teams, drilling down into the tiniest insights your new form delivers.
There you have it. Four simple steps to create your first form with Array, share it with end users, and collect the data from the results. It really is that simple. And if you ever find yourself struggling, our team will be around to offer a helping hand.
We’ll even show you how to link up different tools and apps to make Array even more powerful.
Get To Grips With Simplicity - Try Array Today
If this is your first visit to the Array blog, and you don’t use our simple, effective data-collecting platform, you might wonder what else our powerful tool can do for you.
We’d love to show you. You can arrange a chat with our team, or you can see Array in action for yourself by taking advantage of our free trial. You won’t even need your credit card.